Pages

Friday, February 8, 2013

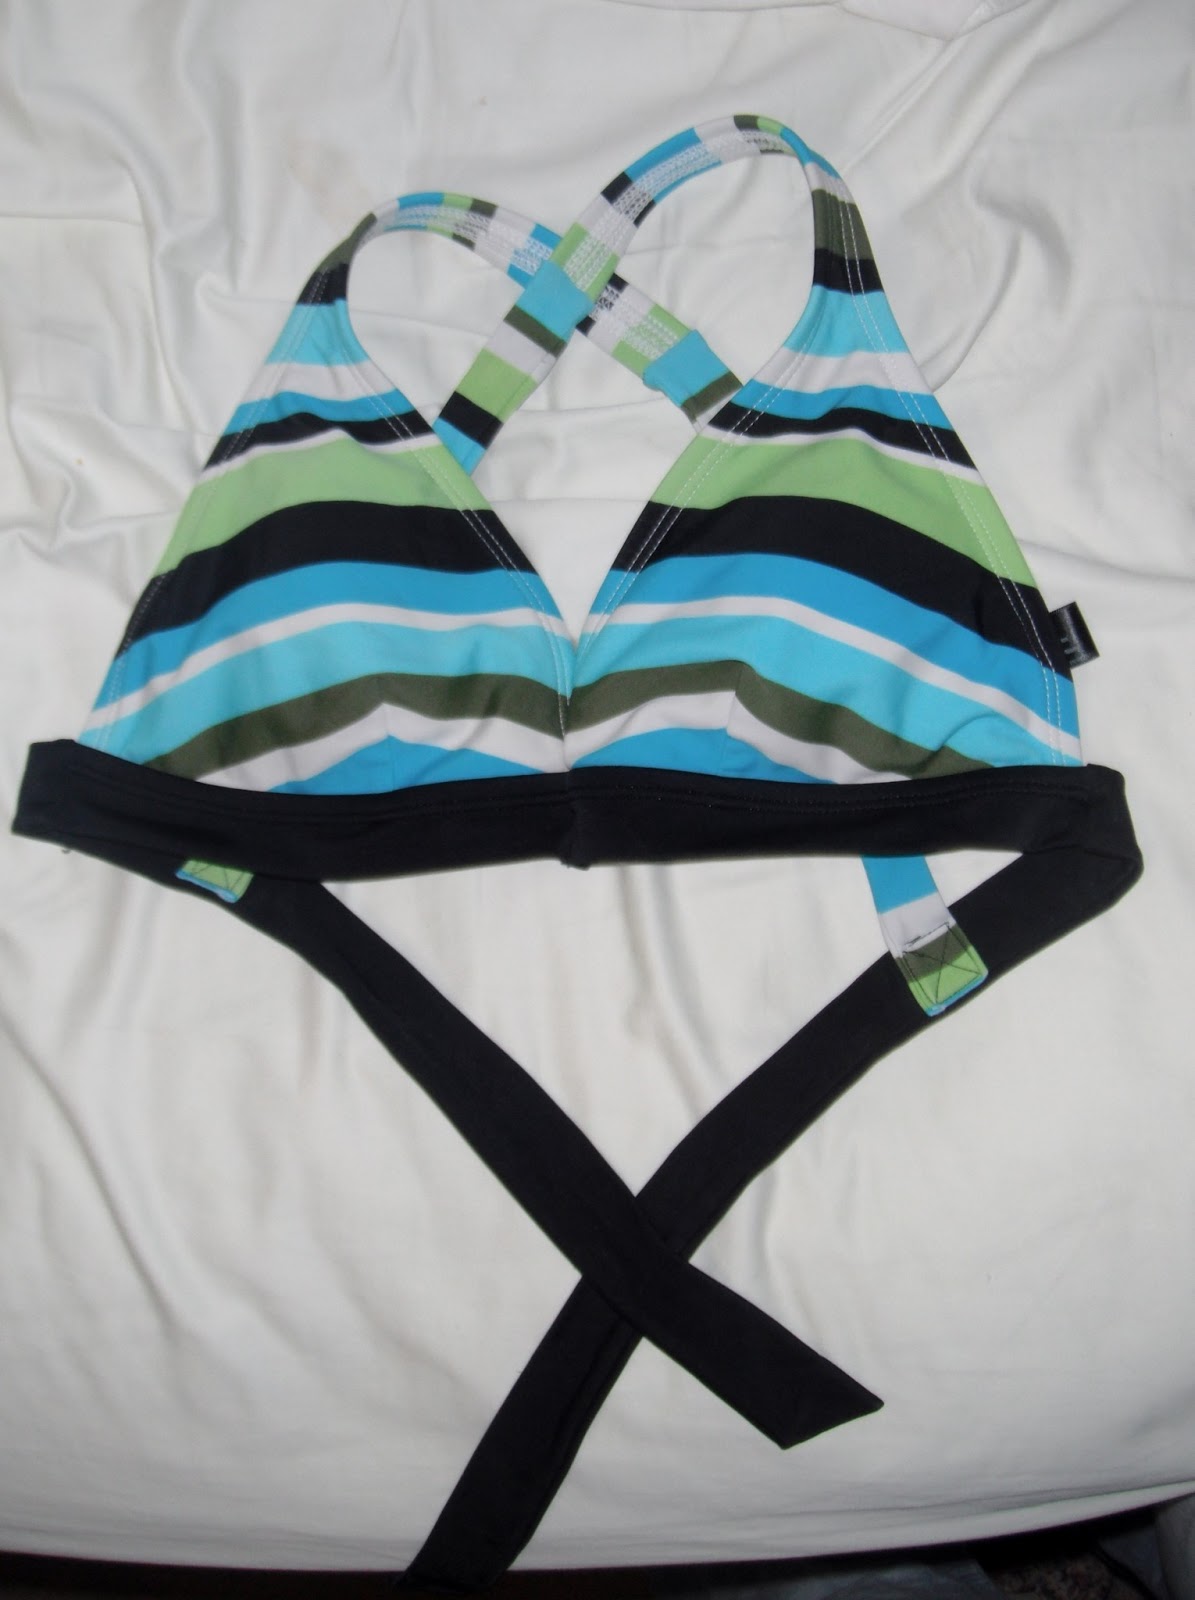
DIY From Halter to Cross-Back

Ever since I got pregnant with Smasher, I cannot STAND having things on my neck. Turtlenecks, long hair, heavy necklaces, or halter tops. They make me nauseous and give me a headache within 15 minutes. 

As you can imagine, combined with my now-saggy post-nursing bewbs, this makes bathing suit shopping EXCRUCIATING. Every thing that isn't a halter, gives no support, or if it DOES have support, it looks like a bra. 

My pre-pregnancy bathing suits, I have discovered, are ALL halters. So I decided to see if I can convert my old halter into a cross-back top. Not only was it a success, it was SUPER simple!

My results: 


Ignore my not-bikini-readiness, please. I'm working on that.
The top had my girls hanging a bit low and wide, so I also added a quick (supposedly) seam up the front to close them in just a bit. I folded the bikini in half, right sides facing, then put a seam up the front of the cups perpendicular to the bottom band. If your bathing suit is fairly thin, you should be able to do this on your sewing machine, but if it is thick, you may want to just hand sew it. I wound up having to do both, because my machine didn't want to stitch through the thickest part where the cups met the band. Then I just trimmed the seam allowance (swimsuit fabric doesn't ravel, so you don't have to  secure the allowance).
Please also ignore my horrendous hand-stitching. 
Now for the Cross-back. My suits straps were long enough to just stretch down and cross, but if yours are not, you can just make some quick new straps from corresponding swimsuit fabric and attach those. 

You can either put on your suit and have a friend cross the straps in the back and pin them for you, or you can pin them first with safety pins and try the top on. You want to stretch the straps when you pull them down, because swimsuits are supposed to stretch to fit your body and they wont support the girls if you don't stretch them any. Just don't stretch the straps to the max or they will pull up your bottom strap in the back and look a bit funky. You don't have to make the straps match, just find a position you like. Then pick whichever strap you like best and remove the pin or pins from the other strap.

Pull off your suit and mark the shoulder strap and the bottom strap you liked with pins at the inside of where they intersect. Put the pins in each strap separately. Remove the pin that had them connected together. It doesn't have to be perfect, the stretch fabric makes this project very forgiving.


See how the pins follow the inside edges of the other straps?

Then, separate the pinned straps and fold the top in half. Line up the cups and bottom straps together evenly and insert a pin in the remaining strap at the same distance from the cups as the pin you already have marked. Repeat for shoulder straps.

Then, lay out your top flat and cross your shoulder straps. Match the meeting points of the pins with the shoulder straps to the inside of the bottom straps, and pin each shoulder strap to its corresponding bottom strap.


Sew straps together with a box, crossing the insides of the box to make an "X". NOTE: If you're doing this with a string bikini, it may be easier just to hand-sew this part. You don't have to make the box and X, just make sure the straps are secure.


Then try it on, and if you like it, trim the ends of the shoulder straps. And, voila! You now have a wonderfully comfortable cross-back bikini top!


Wednesday, February 6, 2013

The Skirt: When Fashion Gets Dangerous

Every now and then I get an idea about something that I want in my wardrobe. Something and it turns into an obsession to find the PERFECT specimen of this thing. This can go well, when I find what I want fairly quickly, or not-so-well, when I can't find what I want and end up spending crazy amounts of time and money hunting.

Usually it goes well when my obsession lines up with current fashions. Sometimes I'm a bit ahead of the curve, but then all I have to do is wait a season or two and fashion will catch up (I'm talking to you, polka dot skinnies).

But occasionally, I get thwarted. The fashion designers and clothing makers out there just don't understand my brilliance. They refuse to produce the exact thing I want. At least, at a price I can afford.

This is one such occasion.

About a year ago, I stumbled across this image over on Esme and the Laneway:

Pinned Image

And it was one of those record-scratch moments where everything sort of changes. 

I love every. single. thing. about this. The full post is here, but here is another fantastic picture of this outfit for you:

love love love this skirt.

I want it all!

The printed, tied-up shirt! The slouchy-but-flattering sweater-thing! 

The dark, gibson-rolled hair!

The fan-freaking-tastic makeup!

But more than anything else, The Skirt. Lovely cream color, with a high waistband but a drop waist. Full, flattering, long. Elegant, but with a little bohemian flair; retro, but with enough edge to be modern. This Skirt is stunning. And I want it. 

And no one sells it.

No one even sells anything LIKE it. I have been hunting for this skirt (or even just something similar) for over a year now.

I'm desperate! I think soon I'm going to have to resort to attempting to make it myself... But I can't even really find a pattern for this skirt!

Pinned Image<--The closest I've gotten is this dress. I suppose I would just have to not make the blouse part.... though I'm not sure how well that would work.

Or I might could make this skirt... and just make one super-extra-long ruffle instead of a bunch... 

My sewing skills at the moment are a bit mediocre, though... So I'm nervous. What if it just doesn't quite turn out? How disappointing would it be to be sooo close, but fail?

I definitely see lots MORE time and energy being spent in the pursuit of The Skirt. Maybe someone just needs to make it for me. 

At a price I can afford. 

Then not sell it to anyone else, so me and Esme can just be the only fabulous ones out there. 


---------------------------------------------------

One last shout-out to Esme and the Laneway. She can do absolutely no wrong in my book. She always looks absolutely perfect and has really been a huge style inspiration to me (I adore the new blonde and pink 'do, too).


**********UPDATE**********

I finally made it! You can see my results here!


Victory in Skirt Form

 Everyone remembers this skirt, right? The fabulous one? Well, I made it! Or- my version at least.


BOOM BABY!


I would have posted this like a week ago, but the hem decided to stage a rebellion, so I had to wage a little week-long war. 

The rest of the skirt only took two days. I used this pattern, but made some significant changes. 
(1) I didn't make the blouse at all. Instead, I topped the yoke with a 2-inch waistband. 
(2) I used fusible interfacing (for the first time EVER!) on the yoke to give it a little more structure. I don't have a great tummy, and I didn't want to show off my pooch too much.
(3) The pattern called for a 2- piece A-line type skirt, with darts at the bottom. I was worried about too much bulk in the gathers, so I just cut a straight skirt from selvage to selvage. 
(4) The pattern is fully lined, but this fabric really doesn't need that, so I just lined the yoke.


The only differences from the inspiration skirt (seen on the right) that I can tell are the color, hem length, and skirt fullness. I couldn't really find a cream colored fabric that would work, but I love this grey color (Bonus: this fabric doesn't wrinkle, either). Second, I hemmed my skirt for flats. Honestly, this deprives it a little bit of its drama. I know myself, though, and if I had hemmed it for heels, it would never get worn. Thirdly, as mentioned above, I was worried about how well this fabric would gather, so I didn't want to make my skirt too full. If I had followed the pattern, there would have been a lot more fullness to the skirt. It might have worked, it might not, but I'm happy with what I have.
This was my first zipper, first time working with interfacing and lining, first time gathering without elastic thread, and first time working with a large pattern. This was definitely a learning project, but I am SO happy with the results! 

This skirt turned out casual enough to wear any day, but nice enough to be snazzy. It's comfortable, too! I have worn it all day and had no problems. If I don't feel like following the inspiration look, this skirt really looks great with just a nice tee shirt over it as well. The drop waist makes it really something special. 


A few lessons learned, here: (1) never underestimate the wisdom of your grandmother, (2)  perfectly matched thread can hide a lot of mistakes, but be really hard to rip out, and (3) hem battles can be long and bloody, but the results are SO worth the fight.

Thanks to the friends and family who inspired me to make this and helped me with fabrics and cutting and all the things that go into making something.


BONUS: Smasher decided to get in on the picture taking. He's such a good helper.


Sunday, January 20, 2013

Butterbeer!


I have recently embarked on a quest (The Grump insists that it is more of an epic journey) to read every book in the Harry Potter series, followed by watching the movies. I am currently reading Year 6 (Harry Potter and the Half-Blood Prince) and I find myself with some odd compulsions now...

For instance, I want to watch British things non-stop just to hear the accents. Top Gear, Downton Abbey, Thor, it doesn't matter, so long as they're accentalicious.

I also want a cloak. I'm restraining myself, because I know I would never actually wear it... But I want one.

And, lastly, I have a terrible craving for butterbeer. Given that this is an imaginary drink, I find this a bit of an awkward craving to have. But I'm determined to satisfy it.

There are a number of recipes online for butterbeer, most of which are attempting to replicate the Butterbeer served at the Wizarding World of Harry Potter. 

Most recipes I found make the foam and beer separately. Now, I'm what one might call a "lazy cook." If it has more than 6 steps and uses more than 2 pans, it's probably not happening. 

There is a good collection here of the most popular replicates of the butterbeer served at the WWOH. The Simple version doesn't seem too bad... but I'll buy the whipped cream, I'm not MAKING it. I may have to try that one. 

Personally, though, I think butterbeer should be alcoholic. Not strong, but enough to get house-elves sloshed. 

This one sounded good, using beer, butterscotch schnapps and rum, but we run into the way-too-much-effort problem again.

So I settled on trying this one. Simple, quick, and boozy. Unfortunately, I didn't like the marshmallow foam very much. It was a bit too sticky for me and the drink as a whole wasn't quite creamy enough. So I tweaked a few things and BAM! Deliciousness.

It is creamy and fizzy all at once, and sweet without being sickly. YUM. 
Best part? No heating, no extra pans, and ONLY TWO STEPS.


My Boozy Butterbeer.
12 oz cream soda
1 1/2 oz butterscotch schnapps
vanilla ice cream
1. Stir schnapps and cream soda together gently in a large glass.
2. Add one large spoonful of ice cream to the top and stir gently til it makes a foam. (Don't add too much ice cream, then it turns more into a float. You really just want enough to make it creamy and give it some foam)

Seriously. Simply. Delicious. The ice cream makes the perfect foam without getting rid of the fizz.

There isn't a LOT of alcohol here. Not even enough to get a lightweight drunk, but if you don't want to use alcohol, butterscotch topping works well too. Just stir well. 

I'm probably going to keep experimenting with this to try and get more "buttery" flavor into it. Will update with results. But this version is pretty wonderful on its own.

Sorry I don't have a picture of mine... I drank it all before I could find my camera.

I swear this picture is straight from a dream I had. Partying with Hermione, Fred, and George. I'm going to pretend that last guy is Neville, cause he was in my dream, too. 

This is the real source, though.


Friday, January 18, 2013

Back in the Groove

So I've been on a slight hiatus since October. Lame, I know. But, life kinda just happened, and it threw off my groove. A lot like that little old lady. But I have since done the necessary booting from the palace window! And my groove is now BACK! 
(For those sad individuals who have not seen The Emperor's New Groove, clarity)

BOOM BABY!!
Soon to come: A recipe review (or 3), my quest for Butterbeer, and the 2nd part of my custom t-shirt series. But, wait! There's more!

Also, a word about my unhealthy obsession with polka dots, progress on The Neverending Quilt of Doom (as I am now calling it), and my epic Harry Potter quest. 

So stay tuned! 

Monday, October 15, 2012

How to Create a Custom-Fitted T-Shirt (Part 1)

I'm not a huge fan of t-shirts. They aren't flattering on me AT ALL. Also, ever since I got pregnant with Smasher, crew necks make me nauseous. I don't mean in some sort of fashion sickness, I mean literally. I feel like I'm being strangled.

But, recently, I have EARNED a few t-shirts, and I am determined to wear them. Which means making them palatable. There are a number of tutorials on the web for how to do this, but most of them require a t-shirt which you already own and like that you trace. I don't really have many that I like. I'd rather make one custom to my body.

So I'm starting, today, a series on how to create a custom-fitted t-shirt from an existing ill-fitting one. 

Part 1 will cover the side seams. This means creating a t-shirt that flatters your body. If the t-shirt you already have already has a comfortable neckline and the sleeves hit the top of your shoulder well, this is all you'll need.

Part 2 will cover the sleeves. If you have a way too-large shirt that needs the sleeves raised, here you go.

Alrighty, let's get started!


Part One: Side Seams

First off, you have to take some measurements. Measure across largest part of your bust, the smallest part of your waist (should be just an inch or two above the belly button) and across your hips (where the shirt hits you, or where you want it to hit you). There is a great illustration here that will show you where all these are if you need help. Make sure to take a deep breath on the chest and waist measurements. You don't want to wind up with something too tight. Now add at least an inch to each number. How much you add will depend on how form-fitting you want your shirt to be. I like mine pretty form fitting, so I add an inch, but if you want a looser fit, then add between 1.5 and 3 inches, or more. That is all preference. Then divide each number by four. If you get a decimal, round up to the nearest 1/4 inch.

For example, imagine these measurements:
Chest: 36 in + 1 = 37 / 4 = 9.25 inches
Waist: 29 in + 1 = 30 / 4 = 7.5 inches
Hips: 36.5 in + 1 = 37.5 / 4 = 9.375 => 9.5 inches

Now put your shirt on inside out. Using chalk or a fabric marking pen, draw a line on the front of the shirt in the center to mark your bust, waist and hip (if the hem of your shirt hits in a good place on your hip, it's not necessary to mark it). When you remove your shirt and lay it out (still inside out), it should look something like this:
Sorry my marks are a little hard to see.
 Now fold your shirt in half, making sure to line up the collar, shoulder seams and all four layers of seam sleeves. Smooth it out best as possible. Don't worry about the sleeves themselves, just make sure the seams are lined up. You should be able to see your marks. If your hem is a bit wonky, try to smooth it if possible, but sometimes t-shirts just have wonky hems because many are cut off-grain. I'll show you in Part 3 how to fix a bad hem. Mine here was a bit off, but only by a half inch, so I decided not to care.
 Now it's time to bring in those calculations from earlier. Line your ruler up with the middle fold of your fabric by the mark for chest like so, making sure the ruler is perpendicular to the folded edge of your shirt:
Then mark your calculation for chest at the end of the ruler. Repeat for your waist and hip marks, using your calculations. If you did not place a mark for your hip, then just make this mark at the hem.
Draw a line with a basic curve to connect these points. Make sure to connect the line up to the sleeve seam and down through the hem as well. NOTE: the line here on the blue shirt is not very good. You want the curves near the hip and chest to be a bit more modest. I had to even these out later. The side seam curve on the brown shirt below is a much better curve.

Then, using either good fabric shears or a rotary cutter, cut through all layers of fabric up to the sleeve seam. Do not cut into the sleeve yet. I placed pins through all layers next to the line before cutting to hold all the layers steady together.
Also a little note about sleeves: If your chest measurement is wider than your sleeve seam (like the brown shirt above) then just stop your cutting at the sleeve seam. Do not cut into the sleeve yet. I will show you how to re-size the sleeve in a moment. This tutorial assumes that the sleeve falls on your shoulders correctly so you don't need to reposition the sleeve, only re-size it. I will go over how to totally reposition the sleeve in Part 2. 
 
Unpin the edge and re-pin so that each side seam is pinned separately. I like to pin it so that I start sewing from the top of the garment for each seam (That's not how my pins are pictured here, though, sorry).
Now, unfold the shirt and smooth out one of the sleeves. Draw a line parallel to the existing seam on the sleeve from the point where your cut-line hits the seam to the hem of the sleeve. Like so:

Cut this line. Fold the shirt in half again and line up the sleeves (again paying particular attention to the sleeve seams and shoulder seams). Then trace this line onto the second sleeve and cut it as well. If you want, you can check the hem lengths of the sleeves to make sure they match.


Pin the sleeves separately then sew one seam down each side of the shirt, starting at the hem of the sleeves, using a 1/4 inch seam allowance. You can use a straight stitch if you like, because t-shirt fabric won't fray. I prefer to go down with a straight stitch, then stitch in the seam allowance with a zig zag stitch to secure it. You could, alternatively, use a zig zag stitch instead of the straight stitch, I've done that before, but in my experience, the stitches tend to pull apart a bit and reveal the string.

And you're done! Try it on!


This picture is after I evened out the curve that was under the armpit. I also made this to have a bit of a looser waist; I added 1.5 inches to the waist measurement. In Part 2, I'll show you a shirt made with 1 inch added. It's a bit more form fitting. 

Side note: I got this shirt at the Mud Run.

Getting Dirty

About a year ago, I took care of my son while The Grump ran in the USMC Mud Run for the first time. I was carrying around about 35 pounds of extra weight (both baby weight and just-married weight) and panting just from walking around the spectators' area pushing a stroller. When The Grump finished, he was so excited, and pumped, and exhausted, that I -in my bloated, overheated delirium- made a decision.

I was going to run the Mud Run.


You see, I wanted to lose weight, but I'd lost weight in the not-so-healthy way before (by just forgetting to eat) and then I gained it all right back. I also didn't feel very healthy. I was always tired, and got dizzy spells. So I didn't want to set a weight goal, I wanted to set a
fitness goal. The Mud Run was it. I decided that if I could finish the run, then no one could call me unfit or lazy. It's 5+ miles long with about 35 obstacles, you would HAVE to be fit to finish, right?

Well, my friends, I did it. I. DID. IT. 


I DID IT!


I did not wear my coach sunglasses the whole time. I promise. I just put them on after the race.

This thing was SERIOUSLY FUN. I didn't do too bad either, if I may say so myself. I struggled with a lot of the climbing obstacles because I'm not so great with the upper body strength, but I do feel like I kept up with the running. 
Shoes before.
Shoes after.
Our team finished the course in just over 2 hours, which is about 30 minutes faster than I thought we would finish. We came in just faster than middleth place out of 615 teams in the coed division, and we were 800-somethingth out of 1434 teams overall.

The Grump was one of my team members. He was so supportive and fantastic. I couldn't have asked for a better teammate.

So the big question now is, do I really feel fit? I reached my fitness goal, right? 

Well, yes and no. Yes, I do feel pretty much like Frau Badass when I compare my current self to myself from last year... I have to say, though, that I really struggled with some of those obstacles. Now, the Mud Run is a team race, so I had three awesome guys with me who helped me get past my rough spots. But I know that I in no way pulled my weight on the team. I know that I slowed them down over some of the obstacles, too, because I was timid (me and heights don't get along) or just couldn't do them on my own.

Also, outside of the Mud Run, I still can't do ten full push ups in a row. I can't do a single pull up, either. There is no way I could pass any military fit test.

So in conclusion, no one can call me "unfit" any more. I have accomplished things, dammit! I may not be the fastest, or the strongest, or the best. But I'm not the slowest, or the laziest, or the worst any more either. This run was not the culmination of my exercise journey that I had wanted it to be. It was, however, a stepping stone. 


I will Run again. I will be be better. I will be stronger. I will pull my weight. 


And I will do a damn pull up! 

Friday, October 12, 2012

Sprouts in Disguise

I hate brussels sprouts. 

Blech.

I have, however, found a way to turn them into a wholly different, delicious thing!!

Seriously. Look at this deliciousness. LOOK. AT. IT.
And ignore the slightly burned pork chop and crappy photography.

Even if you don't like brussels sprouts (which I don't), you'll love this. It's very easy to make, too. Believe me, if I can do it, ANYONE can. I'm really not much of a chef (or even a cook), so I won't share recipes here often. But this is awesome, and I really feel it needs to be shared. I crave this dish. It is the only way I'll eat brussels sprouts (that I've found- I'm always willing to try new ways, though). 

Ingredients:
1 lb Brussels sprouts
Olive oil

BAM. Only 2 ingredients (unless you feel like adding salt).

Use your food processor or grater to shred the brussels sprouts. Heat a few tablespoons of olive oil in a large saucepan over medium heat. When oil is hot, add brussels sprouts and saute until soft and just starting to brown. Add more oil if you have to, but don't over load it. It usually takes about 10 minutes for us to start browning. Add salt if you want (I never do). And enjoy while warm!

It's not particularly good cold, just fyi. Not bad, just better deliciously warm.

Also, a pound may seem like a lot, but it shrinks a bit while cooking. We always make a pound, and never have leftovers. Smasher loves this recipe, too.
 
I love this recipe because I am all about finding new ways to cook veggies. I'm just a bit of a picky eater when it comes to vegetables, so I love it when I find a recipe that makes a gross thing delicious.


Thursday, October 11, 2012

Off Like a Herd of Turtles!

I went running tonight again... Finally.

I have been running pretty regularly for several months now, with the longest break being a week when I was in Houston on vacation. As I was making progress, I really started to love it. About a month ago, though, I started having some foot pain and my knees started to hurt. At the time, I was about 2-3 weeks into a training program that was supposed to increase my distance from 3 miles to about 5.5 miles in 6 weeks. I had just started running 4 miles when I started having this pain, so I decided to take a bit of a break until my foot was feeling better.

This break was supposed to last for 1 or 2 days... But after my foot stopped hurting, I got sick, then I had some issues with my ID so I couldn't get on base to run (our roads are horrible, so I run on a track on base). Every day that I skipped just made it harder to start again.

My one or two day break turned into... 2 weeks.

As mentioned here, I had built up my running in my head to this horrible, involved ordeal and I just didn't want to do it any more. Maybe it was because of how steep my running plan was, or how strict the plan was, or just how much I had started hurting. But in my head, running just plain sucked.

Logically, though, I knew it didn't. For months, I have run multiple times a week and LOVED my runs! I loved the progress I made, I loved how I actually started to feel like a "Runner", everything! I looked forward to getting up and racing myself, and to having that time where I'm doing something just. for. myself.

So I know there are good things about running. And I knew, during this whole break, that if I just went out and did it, it wouldn't be so bad. I would get it out of the way, get over my roadblock, and get back in the groove. I would finish my run, red-faced and grinning, and smack myself on the forehead for waiting so long.

Well, I FINALLY got my a$$ out and ran today.

Aaaaaaaaaand....

Meh.
I started hurting within the first minute. Once one ache stopped, another would start. My knee, my side, my other knee, my shoulder... On and on until they finally stopped, or I just got better at ignoring them. I reached my 3 miles, but it wasn't any fun. I was bored the whole time as well. Maybe it's because I'm still missing my superfantastic running partner. Then, by the time I got home, both of my knees were swollen and my foot had started hurting again... After ONE run! (I think it's due to inflammation, and I'm researching how to fix it). The run wasn't horrible, but it wasn't easy, and it wasn't good, either.

I just don't know about running any more. I think the bloom is off that rose. I need to either find the love again, or find something else to love. Because, after only two weeks of laziness, The Grump has already mentioned that I've started looking chubby. 

And no, I won't let that go. -_-

The plan now is no running until I finish the Mud Run on Saturday. Then, I think I'm just going to run 2-3 times a week. I also think I'm going to switch it up. Instead of distance, I think I may work on shorter sprint sessions. My favorite part of my run has always been that last minute, or 200 meters where I give it everything I have. Maybe sprinting sessions wont allow me the time to get bored. PLUS, I'm a pretty slow runner; I know I need to work on my speed. 

Seems like a win-win there.


BONUS: This is how Smasher looked when I went to wake him up yesterday. These bunny suits are killing me.

I think this is a pretty good representation of my laziness level the past two weeks.


Saturday, October 6, 2012

This Foot is Made for Walkin'

I finally started to quilt my quilt today. I didn't get very far because my family got home and I didn't want to be all antisocial, hiding in the back room stitching away.


My rig.
<--- I tried out my walking foot. It wasn't nearly as scary as I thought it would be. I had to tweak tension a bit, but that could have been because of the ridiculous amount of fabric under the needle. 


Wrestling with the copious amount of fabric on all sides of the needle wasn't too bad either. I may revise this opinion when I'm smack dab in the middle of the quilt, however. I'm definitely glad this quilt is on the smaller side.

I did have to break out my handy-dandy seam ripper. Both because of user error and also because I started to quilt "in the ditch" (sewing right on the seam between the connected fabrics) and I really didn't like the way it turned out. I don't trust myself to sew a straight enough line to make "in the ditch" look really good. 

To be fair, I wouldn't trust myself to sew a straight stitch to save my life. 

Please ignore the wonky lines and toddler foot.
In light of this, I've decided to do a sort of baseball stitching (I'm not sure what this is called in quilting). It's just stitching slightly to each side of every seam. I'm really liking it so far. It really makes the stripes pop without disrupting them. I don't trust myself to quilt any sort of designs yet, and I think any more lines would be distracting.

 I constantly have to remind myself to slow down when I start to move fast. It's just too easy for me to slip up a hand and shoot off  in the wrong direction. I'm just not comfortable enough with quilting specifically and sewing in general to move as fast as my impatience insists on moving.

Smasher smashing.
Smasher loves this thing. Every time I lay it out to look at it on the whole - or baste it, or fold it, or any number of things - he runs over to stand on it or sit on it. He cracks me up. I hope he still likes it as much when it is finished.


Sorry about all the crappy pictures. For some reason that room is always dark. I wish you could see better detail in the pictures. Oh wait... Then you might be able to spot my more subtle disasters... Never mind! Enjoy the dim (or overexposed), small pictures.


Total progress today.

Friday, October 5, 2012

The Gate


Every now and then, when I have a project I need (or want) to do. I start to get anxiety about it. 

Going on to the next step just becomes difficult. I have built it up in my mind to mountainous proportions and I just get scared to start. I just don't want to take that first step. 

I need to get started on something, and I just can't get out of The Gate. 

Right now, I'm dealing with a few of those. 

I have my first quilt all together and basted, ready to quilt. But I'm really hesitant to start. I'm terrified of my walking foot. I'm really worried about how hard it's going to be to handle that much fabric while sewing. I'm just nervous. Logically, I know it won't be too difficult. I may have to utilize my handy-dandy seam ripper, but I really don't think it'll be too bad.

I just can't bring myself to make that first stitch.

I have a short paper due for school (less than a page). I have already written one paper for this class, and it wasn't bad at all. I'm really hesitant to do anything more than plan for this paper, though. I keep opening the word document, then closing it without doing anything.

I just can't bring myself to type that first word.

The worst right now is probably my running. About 2 weeks ago, my schedule got all messed up, then I didn't have an ID to get on base, then I got sick. I'm all better now, have been for a few days. But I still haven't gone out running in the morning yet. I haven't done any strength training at home, either, like I had planned. I think part of it is because I have fallen off the wagon of my training plan. But I need to jump back in. I know it's not hard, I have been running multiple times a week for months now.

I just can't bring myself to get up and take that first step.


I know once I actually force myself to start, it won't be so bad. It never is. I've done this with numerous projects before. It is just built up in my head to epic proportions. Once I get started, I'll be fine and blast right through it.

I just need to get out of The Gate.

http://www.saalonmuyo.com/wp-content/uploads/2012/08/ghostbusters-gatekeeper.jpeg
I am the Gate Keeper. Are you the Key Master?

Wednesday, October 3, 2012

My Pattern Rut

So I have come to realize something about myself recently... When I like something, I really like it. And I - unintentionally - wind up buying it over and over again.


1x1 British 3/4 Sleeve Tee
Available here.

 For example:

<---- I have three shirts that all look exactly like this. Except different colors. When shopping earlier, I thought, "ohhh that shirt is really cute" without even registering that I have three EXACTLY like it. All bought at different times, from different stores. 

I also go through color ruts. However unconsciously, for a time, every thing I buy winds up being the same color. I had a Coral Phase, followed by a Navy Phase, followed by a Mint Phase, followed by a Grey Phase.... Every workout thing I own is grey or mint, because I was in those ruts while stocking up on workout gear.... I'm still in the Grey Phase, come to think of it....

And now, I've just discovered that I'm in a pattern rut.

I've decided I'm going to make a quilt for mine and The Grump's bed. I just wanted to pick a pattern and color scheme (I'm thinking grey... big surprise) before buying fabric. And I've found myself drawn to the same types of patterns. 

Oooooh lovely lattices...

Like this one.

And this one. This one is grey, too!


And this one.


So I think I'm actually going to make one like THIS magnificence. In grey, of course. Perhaps with some yellow and teal.


The funniest thing about all this is that recently I had to throw out a crocheted afghan which I had been working on for several years. I had intended to make this for my bed in my first home. I don't have any pictures of the afghan (I lost the instruction book for it years ago, as well), but I just realized a few days ago that it was a - drum roll please - LATTICE DESIGN! It even had little squares inside of big squares, like the quilt I JUST decided to make a few days before!!

I guess I like what I like... but DAMN. 

Apparently, I'm stuck in an EIGHT YEAR  pattern rut. Maybe I'll get over it once I actually get around to making this thing...

Does anyone else do this? Or am I just a weirdo?


Tuesday, October 2, 2012

OH NO! It's the BLOOOOOG!

We'll, I've done it. I have entered the blog-o-sphere.


The word "blog" freaks me out just a bit. It sounds like a comic book monster to me. 

.... Run for your lives!!! It's the BLOOOOOOG!

.... This is my pet Blog. He may just destroy my house. Or eat up all my time. 

... Tremendous upkeep, those blogs are. 

... Having a blog is a big responsibility, Johnny.

ALRIGHTY THEN! That's enough of that.


I'm not totally sure what type of blog this is going to be yet. Probably mostly a craft blog. With a few recipes here and there if they are particularly noteworthy. And any ideas, musings, rants, or inspirations that strike my fancy. Stay tuned to find out!!!

Rant number one: I really really hate it when I start something new (a journal or program or planner or whatnot) and it is bare. Anyone else hate that? Whenever I start a new planner or calendar, I spend about an hour filling it in with as many things as I can possibly think of just so it's not... so... empty.
So there will probably be lots of frantic postings and rearrangings and such until I get in the groove of things and get everything situated juuuust right. Gotta fill in lots of those blanks so there is something to actually look at here. 

Thank you for reading my very first post!! There will be more soon, I'm sure!