Pages

Showing posts with label sew. Show all posts

Friday, February 8, 2013

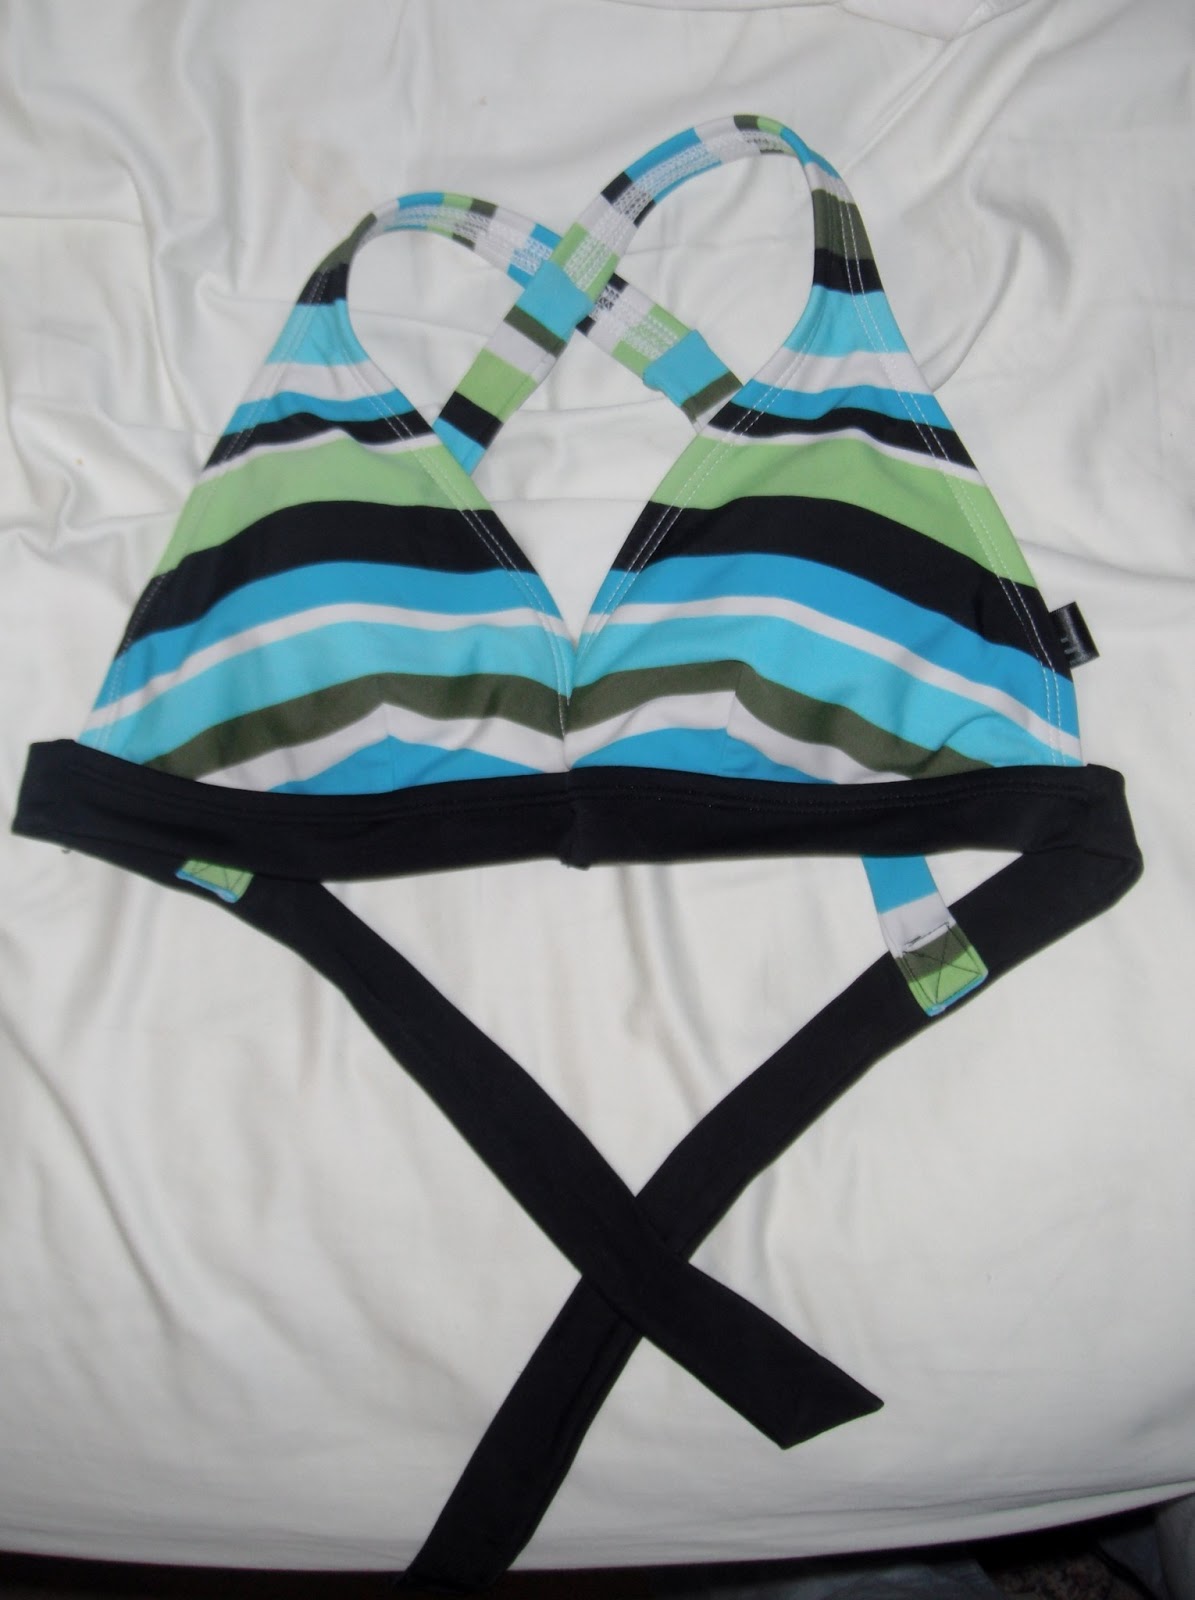
DIY From Halter to Cross-Back

Ever since I got pregnant with Smasher, I cannot STAND having things on my neck. Turtlenecks, long hair, heavy necklaces, or halter tops. They make me nauseous and give me a headache within 15 minutes. 

As you can imagine, combined with my now-saggy post-nursing bewbs, this makes bathing suit shopping EXCRUCIATING. Every thing that isn't a halter, gives no support, or if it DOES have support, it looks like a bra. 

My pre-pregnancy bathing suits, I have discovered, are ALL halters. So I decided to see if I can convert my old halter into a cross-back top. Not only was it a success, it was SUPER simple!

My results: 


Ignore my not-bikini-readiness, please. I'm working on that.
The top had my girls hanging a bit low and wide, so I also added a quick (supposedly) seam up the front to close them in just a bit. I folded the bikini in half, right sides facing, then put a seam up the front of the cups perpendicular to the bottom band. If your bathing suit is fairly thin, you should be able to do this on your sewing machine, but if it is thick, you may want to just hand sew it. I wound up having to do both, because my machine didn't want to stitch through the thickest part where the cups met the band. Then I just trimmed the seam allowance (swimsuit fabric doesn't ravel, so you don't have to  secure the allowance).
Please also ignore my horrendous hand-stitching. 
Now for the Cross-back. My suits straps were long enough to just stretch down and cross, but if yours are not, you can just make some quick new straps from corresponding swimsuit fabric and attach those. 

You can either put on your suit and have a friend cross the straps in the back and pin them for you, or you can pin them first with safety pins and try the top on. You want to stretch the straps when you pull them down, because swimsuits are supposed to stretch to fit your body and they wont support the girls if you don't stretch them any. Just don't stretch the straps to the max or they will pull up your bottom strap in the back and look a bit funky. You don't have to make the straps match, just find a position you like. Then pick whichever strap you like best and remove the pin or pins from the other strap.

Pull off your suit and mark the shoulder strap and the bottom strap you liked with pins at the inside of where they intersect. Put the pins in each strap separately. Remove the pin that had them connected together. It doesn't have to be perfect, the stretch fabric makes this project very forgiving.


See how the pins follow the inside edges of the other straps?

Then, separate the pinned straps and fold the top in half. Line up the cups and bottom straps together evenly and insert a pin in the remaining strap at the same distance from the cups as the pin you already have marked. Repeat for shoulder straps.

Then, lay out your top flat and cross your shoulder straps. Match the meeting points of the pins with the shoulder straps to the inside of the bottom straps, and pin each shoulder strap to its corresponding bottom strap.


Sew straps together with a box, crossing the insides of the box to make an "X". NOTE: If you're doing this with a string bikini, it may be easier just to hand-sew this part. You don't have to make the box and X, just make sure the straps are secure.


Then try it on, and if you like it, trim the ends of the shoulder straps. And, voila! You now have a wonderfully comfortable cross-back bikini top!


Wednesday, February 6, 2013

The Skirt: When Fashion Gets Dangerous

Every now and then I get an idea about something that I want in my wardrobe. Something and it turns into an obsession to find the PERFECT specimen of this thing. This can go well, when I find what I want fairly quickly, or not-so-well, when I can't find what I want and end up spending crazy amounts of time and money hunting.

Usually it goes well when my obsession lines up with current fashions. Sometimes I'm a bit ahead of the curve, but then all I have to do is wait a season or two and fashion will catch up (I'm talking to you, polka dot skinnies).

But occasionally, I get thwarted. The fashion designers and clothing makers out there just don't understand my brilliance. They refuse to produce the exact thing I want. At least, at a price I can afford.

This is one such occasion.

About a year ago, I stumbled across this image over on Esme and the Laneway:

Pinned Image

And it was one of those record-scratch moments where everything sort of changes. 

I love every. single. thing. about this. The full post is here, but here is another fantastic picture of this outfit for you:

love love love this skirt.

I want it all!

The printed, tied-up shirt! The slouchy-but-flattering sweater-thing! 

The dark, gibson-rolled hair!

The fan-freaking-tastic makeup!

But more than anything else, The Skirt. Lovely cream color, with a high waistband but a drop waist. Full, flattering, long. Elegant, but with a little bohemian flair; retro, but with enough edge to be modern. This Skirt is stunning. And I want it. 

And no one sells it.

No one even sells anything LIKE it. I have been hunting for this skirt (or even just something similar) for over a year now.

I'm desperate! I think soon I'm going to have to resort to attempting to make it myself... But I can't even really find a pattern for this skirt!

Pinned Image<--The closest I've gotten is this dress. I suppose I would just have to not make the blouse part.... though I'm not sure how well that would work.

Or I might could make this skirt... and just make one super-extra-long ruffle instead of a bunch... 

My sewing skills at the moment are a bit mediocre, though... So I'm nervous. What if it just doesn't quite turn out? How disappointing would it be to be sooo close, but fail?

I definitely see lots MORE time and energy being spent in the pursuit of The Skirt. Maybe someone just needs to make it for me. 

At a price I can afford. 

Then not sell it to anyone else, so me and Esme can just be the only fabulous ones out there. 


---------------------------------------------------

One last shout-out to Esme and the Laneway. She can do absolutely no wrong in my book. She always looks absolutely perfect and has really been a huge style inspiration to me (I adore the new blonde and pink 'do, too).


**********UPDATE**********

I finally made it! You can see my results here!


Victory in Skirt Form

 Everyone remembers this skirt, right? The fabulous one? Well, I made it! Or- my version at least.


BOOM BABY!


I would have posted this like a week ago, but the hem decided to stage a rebellion, so I had to wage a little week-long war. 

The rest of the skirt only took two days. I used this pattern, but made some significant changes. 
(1) I didn't make the blouse at all. Instead, I topped the yoke with a 2-inch waistband. 
(2) I used fusible interfacing (for the first time EVER!) on the yoke to give it a little more structure. I don't have a great tummy, and I didn't want to show off my pooch too much.
(3) The pattern called for a 2- piece A-line type skirt, with darts at the bottom. I was worried about too much bulk in the gathers, so I just cut a straight skirt from selvage to selvage. 
(4) The pattern is fully lined, but this fabric really doesn't need that, so I just lined the yoke.


The only differences from the inspiration skirt (seen on the right) that I can tell are the color, hem length, and skirt fullness. I couldn't really find a cream colored fabric that would work, but I love this grey color (Bonus: this fabric doesn't wrinkle, either). Second, I hemmed my skirt for flats. Honestly, this deprives it a little bit of its drama. I know myself, though, and if I had hemmed it for heels, it would never get worn. Thirdly, as mentioned above, I was worried about how well this fabric would gather, so I didn't want to make my skirt too full. If I had followed the pattern, there would have been a lot more fullness to the skirt. It might have worked, it might not, but I'm happy with what I have.
This was my first zipper, first time working with interfacing and lining, first time gathering without elastic thread, and first time working with a large pattern. This was definitely a learning project, but I am SO happy with the results! 

This skirt turned out casual enough to wear any day, but nice enough to be snazzy. It's comfortable, too! I have worn it all day and had no problems. If I don't feel like following the inspiration look, this skirt really looks great with just a nice tee shirt over it as well. The drop waist makes it really something special. 


A few lessons learned, here: (1) never underestimate the wisdom of your grandmother, (2)  perfectly matched thread can hide a lot of mistakes, but be really hard to rip out, and (3) hem battles can be long and bloody, but the results are SO worth the fight.

Thanks to the friends and family who inspired me to make this and helped me with fabrics and cutting and all the things that go into making something.


BONUS: Smasher decided to get in on the picture taking. He's such a good helper.


Monday, October 15, 2012

How to Create a Custom-Fitted T-Shirt (Part 1)

I'm not a huge fan of t-shirts. They aren't flattering on me AT ALL. Also, ever since I got pregnant with Smasher, crew necks make me nauseous. I don't mean in some sort of fashion sickness, I mean literally. I feel like I'm being strangled.

But, recently, I have EARNED a few t-shirts, and I am determined to wear them. Which means making them palatable. There are a number of tutorials on the web for how to do this, but most of them require a t-shirt which you already own and like that you trace. I don't really have many that I like. I'd rather make one custom to my body.

So I'm starting, today, a series on how to create a custom-fitted t-shirt from an existing ill-fitting one. 

Part 1 will cover the side seams. This means creating a t-shirt that flatters your body. If the t-shirt you already have already has a comfortable neckline and the sleeves hit the top of your shoulder well, this is all you'll need.

Part 2 will cover the sleeves. If you have a way too-large shirt that needs the sleeves raised, here you go.

Alrighty, let's get started!


Part One: Side Seams

First off, you have to take some measurements. Measure across largest part of your bust, the smallest part of your waist (should be just an inch or two above the belly button) and across your hips (where the shirt hits you, or where you want it to hit you). There is a great illustration here that will show you where all these are if you need help. Make sure to take a deep breath on the chest and waist measurements. You don't want to wind up with something too tight. Now add at least an inch to each number. How much you add will depend on how form-fitting you want your shirt to be. I like mine pretty form fitting, so I add an inch, but if you want a looser fit, then add between 1.5 and 3 inches, or more. That is all preference. Then divide each number by four. If you get a decimal, round up to the nearest 1/4 inch.

For example, imagine these measurements:
Chest: 36 in + 1 = 37 / 4 = 9.25 inches
Waist: 29 in + 1 = 30 / 4 = 7.5 inches
Hips: 36.5 in + 1 = 37.5 / 4 = 9.375 => 9.5 inches

Now put your shirt on inside out. Using chalk or a fabric marking pen, draw a line on the front of the shirt in the center to mark your bust, waist and hip (if the hem of your shirt hits in a good place on your hip, it's not necessary to mark it). When you remove your shirt and lay it out (still inside out), it should look something like this:
Sorry my marks are a little hard to see.
 Now fold your shirt in half, making sure to line up the collar, shoulder seams and all four layers of seam sleeves. Smooth it out best as possible. Don't worry about the sleeves themselves, just make sure the seams are lined up. You should be able to see your marks. If your hem is a bit wonky, try to smooth it if possible, but sometimes t-shirts just have wonky hems because many are cut off-grain. I'll show you in Part 3 how to fix a bad hem. Mine here was a bit off, but only by a half inch, so I decided not to care.
 Now it's time to bring in those calculations from earlier. Line your ruler up with the middle fold of your fabric by the mark for chest like so, making sure the ruler is perpendicular to the folded edge of your shirt:
Then mark your calculation for chest at the end of the ruler. Repeat for your waist and hip marks, using your calculations. If you did not place a mark for your hip, then just make this mark at the hem.
Draw a line with a basic curve to connect these points. Make sure to connect the line up to the sleeve seam and down through the hem as well. NOTE: the line here on the blue shirt is not very good. You want the curves near the hip and chest to be a bit more modest. I had to even these out later. The side seam curve on the brown shirt below is a much better curve.

Then, using either good fabric shears or a rotary cutter, cut through all layers of fabric up to the sleeve seam. Do not cut into the sleeve yet. I placed pins through all layers next to the line before cutting to hold all the layers steady together.
Also a little note about sleeves: If your chest measurement is wider than your sleeve seam (like the brown shirt above) then just stop your cutting at the sleeve seam. Do not cut into the sleeve yet. I will show you how to re-size the sleeve in a moment. This tutorial assumes that the sleeve falls on your shoulders correctly so you don't need to reposition the sleeve, only re-size it. I will go over how to totally reposition the sleeve in Part 2. 
 
Unpin the edge and re-pin so that each side seam is pinned separately. I like to pin it so that I start sewing from the top of the garment for each seam (That's not how my pins are pictured here, though, sorry).
Now, unfold the shirt and smooth out one of the sleeves. Draw a line parallel to the existing seam on the sleeve from the point where your cut-line hits the seam to the hem of the sleeve. Like so:

Cut this line. Fold the shirt in half again and line up the sleeves (again paying particular attention to the sleeve seams and shoulder seams). Then trace this line onto the second sleeve and cut it as well. If you want, you can check the hem lengths of the sleeves to make sure they match.


Pin the sleeves separately then sew one seam down each side of the shirt, starting at the hem of the sleeves, using a 1/4 inch seam allowance. You can use a straight stitch if you like, because t-shirt fabric won't fray. I prefer to go down with a straight stitch, then stitch in the seam allowance with a zig zag stitch to secure it. You could, alternatively, use a zig zag stitch instead of the straight stitch, I've done that before, but in my experience, the stitches tend to pull apart a bit and reveal the string.

And you're done! Try it on!


This picture is after I evened out the curve that was under the armpit. I also made this to have a bit of a looser waist; I added 1.5 inches to the waist measurement. In Part 2, I'll show you a shirt made with 1 inch added. It's a bit more form fitting. 

Side note: I got this shirt at the Mud Run.